Creating a presentation that captivates your audience requires more than just compelling content. Visual aesthetics play a pivotal role in engaging your viewers and conveying your message effectively. One of the key elements in designing a visually striking presentation is the choice of colour scheme. In this guide, we’ll explore the best presentation colour schemes to ensure your slides leave a lasting impact.
Colours aren’t just pretty pixels; they’re an expressive language that dances with emotions, vibes, and stories. When used right, they’re the secret sauce that makes your presentation pop, crackle, and sizzle.
Violet Gradient
Violet, with its rich blend of blue and red, symbolises harmony, creativity, and inspiration. A gradient, which smoothly transitions from one shade to another, adds depth and intrigue to your design. When combined, a violet gradient becomes a canvas for innovation, offering a visually stunning backdrop that captures attention and conveys a sense of elegance.
Codes: #DDBFE4 #9289D5 #B6A5E0 #EAB8CC #DC95B0
Blue and White
Using a bright blue and white colour scheme into your PowerPoint presentation is like to infusing your slides with a jolt of energy and professionalism. The boldness of bright blue, combined with the clarity of white, creates a compelling visual narrative that captures attention and enhances communication. By maintaining visual consistency and embracing design principles, you can create a presentation that resonates with modernity and vibrancy.
Codes: #1007DC #FEF5E2 #FFFFFF
Teal, Orange and Black
The dynamic trio of teal, orange, and black emerges as a striking and energetic colour scheme that can transform your PowerPoint presentation into a visually engaging masterpiece. This colour combination captures attention, adds vibrancy, and establishes a compelling visual narrative. By maintaining consistency and embracing design principles, you can create a presentation that resonates with vitality and sophistication.
Codes: #21E9C5 #21E9C5 #21E9C5
Bright Coral
Bright coral color palettes radiate energy, creativity, and enthusiasm. When paired with a clean white background, this color combination offers a dynamic and visually appealing contrast, making it an excellent choice for presentations that demand attention and vibrancy.
Codes: #FF625C #FF7168 #FFFFFF
Black and Yellow
The striking duo of black and yellow emerges as a powerful color scheme, one that commands attention, radiates energy, and communicates messages with striking clarity.
Codes: #000000 #FED650 #FFFFFF
Beige and Green
This harmonious color palette captures attention, exudes sophistication, and communicates messages with clarity. By maintaining consistency and embracing design principles, you can create a presentation that resonates with refinement, warmth, and balance.
Codes: #EDDAC #DDDED9 #FFFFFF
Natural Colours
This colour scheme exudes a sense of calmness and balance, making it an ideal choice for presentations that aim to convey a peaceful message. Opting for a gentle, non-white background can be highly beneficial for screens and projected presentations, as it mitigates the starkness typically associated with a white backdrop. The soft colouring offers a more comfortable reading and viewing experience, reducing strain on the eyes.
Codes: #89B374 #B5C266 #E4E4E4
Natural Colours
The use of a light blue colour palette paired with a minimalist design is currently in vogue and offers exceptional readability. You have the opportunity to infuse a stylish touch by incorporating black-and-white imagery or introducing a rich navy-blue accent for header text. Although a soft blue shade is the preferred choice in this context, you can also explore alternative pastel colours while adhering to the same overarching theme to achieve a contemporary presentation design.
Codes: #ACDCF9 #204458 #FFFFFF
Dark Colours
The current prevailing trend in the world of design encompasses dark mode color schemes, and this trend extends to presentation design as well. The combination of purple and emerald hues against a backdrop of black with white text yields a visually stunning result. It exudes a sleek and contemporary aesthetic, possessing significant visual appeal without the need for extensive image usage.
This particular scheme is most effective for digital presentations, where concerns related to room lighting are not a factor of consideration.
Codes: #302146 #3B5C58 #000000
Blue and Lime
Pairing navy with lime presents a contemporary twist on the concept of vibrant neutrals, injecting an element of excitement into what might otherwise be considered mundane. These hues strike a pleasing balance when set against a white or light background and are relatively versatile in application. Given that numerous brands already incorporate blue within their core color palettes, this combination seamlessly integrates with existing branding elements.
Furthermore, this colour pairing benefits from a minimalist slide structure. This approach allows the colours’ vibrancy and impact to take centre stage. Whether juxtaposed with full-colour images or black and white visuals, they maintain their visual prowess.
Codes: #BAC500 #120280 #FFFFFF
Grey and Blue Tints
While the purplish blue-gray shade featured in the Business PowerPoint Presentation template is indeed striking, it exemplifies a broader trend in presentation design. The approach involves selecting a specific color, perhaps your primary brand hue, and employing various shades and tones to construct your presentation’s color palette.
By blending this chosen colour with white, black, and various shades of grey, you can create a captivating array of colour variations that seamlessly align with your messaging.
Codes: #525368 #7A7A7A #FFFFFF
Blacks and Reds
If you’re crafting a presentation intended for screen display, such as desktops or tablets, a dark backdrop complemented by vibrant colour accents and white text can be a suitable choice. However, it’s essential to acknowledge that this combination can pose challenges when projected onto screens. Although reverse text and the use of red are not universally recommended, as illustrated by the Nova template, they can form an impressive pairing. It’s worth noting, though, that this contemporary colour scheme is most fitting for particular types of content and specific audiences.
No matter how far apart you live from your friends or family, staying connected and having fun together is still possible. Virtual games have opened up a world of possibilities, including hosting a fantastic game night party over Zoom or other video chat services. Among the many virtual games available, the PowerPoint party has emerged as a popular trend, starting back in 2020 on TikTok and still going strong in 2023.
What is a PowerPoint Party
In a PowerPoint party, you and your friends come together to present hilarious and silly topics to each other. It’s a stay-in-sweats activity that guarantees loads of excitement and laughter. Whether you’re reading a teleprompter blind or debating which Disney villain deserves redemption, the presentations are sure to be entertaining.
To host a PowerPoint night, all you need is a small-ish friend group, and you’re good to go. You can present individually or in groups, ensuring everyone gets a chance to shine. Embrace the virtual world by sharing your screen or presenting on your TV with the help of an HDMI chord, AirPlay, or Chromecast. So, gather your friends, grab some snacks, and get ready to have a blast at your very own virtual PowerPoint party!
Unleash Creativity and Fun with These Tips
If you’re planning a PowerPoint party that your friends will talk about for years to come, we’ve got you covered with some awesome tips to make it even more exciting and unforgettable. Get ready to embrace creativity and have a blast at your upcoming PowerPoint Night!
Theme It Up – Set a theme that ignites everyone’s imagination. Whether it’s a throwback to a specific decade, a celebration of pop culture, or a showcase of personal interests, having a theme adds a fun twist to each presentation. Challenge Accepted – Add some friendly competition by setting rules like time limits for each presentation. It keeps the energy high and ensures everyone’s presentation is concise and engaging. Don’t forget to include guidelines for incorporating humour; after all, laughter is the secret ingredient to a successful PowerPoint party. Passionate Presentations – Encourage your friends to choose topics that truly speak to their hearts. From hobbies to wild theories, let each presenter shine by sharing what they love most. Tech Savvy – Avoid any technical hiccups by sharing the video call link early. Decide if everyone will share their screen during their presentation, or if you’ll be the master of ceremonies, showcasing each presentation one by one. Express Yourself – Whether you’re using PowerPoint, Google Slides, or Keynote, let your creativity run wild. Add images, charts, graphs, quotes, gifs, and videos to make your point and have fun with your presentation. Remember, most PowerPoint parties thrive on a playful and goofy atmosphere. Engage Your Audience – Keep everyone involved by incorporating interactive elements like quizzes or polls into your presentation. Get the audience laughing and participating throughout the night. Dress to Impress – If your theme allows, encourage guests to dress up according to the chosen era or concept. It sets the mood and adds an extra layer of excitement to the party. Appreciation Time – After each presentation, offer positive feedback and applause. Celebrate each presenter’s efforts and creativity, making everyone feel valued and accomplished.
PowerPoint Night Ideas
Determine the topics in advance and ensure you have all the necessary tools you need. Here are some creative PowerPoint night ideas to kickstart your planning process.
Conspiracy Theories – Dive into popular conspiracy theories and present your findings on their plausibility.
Movie Mash-Ups – Blend two different movie plots to create hilarious and unpredictable mash-ups.
What kind of *blank* is Everyone -It’s time to share your associations with your friends. Choose a category and match each of your friends with an item from that category.
The one thing you can’t live without – We all have that one trusty tool we’ve been using since our senior year of high school. Share your secret weapon with your friends and maybe even give them a tutorial to showcase its full potential.
Inventions That Should Exist – Get inventive and showcase your ideas for amazing inventions the world needs.
Childhood Memories – Take a trip down memory lane and share funny and heart-warming childhood stories.
Haunted Places and Urban Legends – Explore spooky haunted places and share chilling urban legends.
Fictional Character Roast – Roast your favourite fictional characters with witty and humorous remarks.
Celebrity Look-Alike– Compare friends to celebrity look-alikes and vote on the best match.
Iconic TV Theme Songs – Play TV theme songs and guess which shows they belong to.
Animated Movie Madness – Analyse and rank your favourite animated movies based on various criteria.
Parallel Universe Friends –Explore how your friends might be different in a parallel universe with humorous scenarios.
Which friend would die first in a horror movie – It might probably be you.
Aliens Among Us – Reveal who among your friends might secretly be an alien with entertaining evidence.
Family Feud – Host a virtual family feud game with pop culture-themed questions and challenges
The Fashion Police – Playfully critique your friends’ fashion choices with a humorous fashion police-themed night.
Real-Life Superpowers – Imagine what superpowers you and your friends would have in the real world.
Teenage Time Capsule – Compile a virtual time capsule of memorable teen trends, memes, and challenges.
Meme Wars – Create humorous memes and engage in a friendly meme competition with your friends.
Alternate Endings – Rewrite the endings of famous movies or books with your own creative twists.
Everyone’s Green/Red flags – Raise your friends’ green flag high and recognise the occasional red flag moments with humour.
What If… Scenarios –Explore entertaining “what if” scenarios and their humorous outcomes in various situations.
Invent-a-Sport Competition –Come up with the wackiest and most hilarious new sports and present them to the group.
Pop Culture Karaoke Night – Sing popular songs from movies, TV shows, and music artists in a karaoke challenge.
Misheard Lyrics Contest – Present misheard lyrics of popular songs and see who can come up with the funniest versions.
Family Holiday Pitch Deck – Create a pitch deck design around the next proposed family holiday destination, arguing why you think it should be chosen.
While persuasive content and a well-structured storyline are vital, integrating engaging presentation transitions and animations can significantly enhance your presentation’s effectiveness. These visual elements not only captivate your audience but also reinforce key points, ensuring sustained interest throughout the session. In this article, we will explore the best presentation transitions and animations that can elevate your business presentations to new heights.
Animation vs. Transitions
Animations and transitions are two distinct features that contribute to the visual appeal and overall flow of your presentation.
Presentation Animations refer to the effects applied to individual elements (such as text, images, shapes, etc.) within a slide. These effects determine how elements appear, disappear, or move on the slide during the presentation. Animations help add emphasis, interactivity, and engagement to your content, making it more dynamic and visually appealing. Animations are typically used to reveal content step-by-step, draw attention to specific points, or create engaging effects.
Transitions, on the other hand, control how one slide moves to the next during the presentation. They apply to the entire slide and dictate the visual effect used to switch from one slide to another. Transitions help in creating a seamless flow between slides and avoid abrupt jumps, making the presentation look more professional and polished. Transitions play a crucial role in pacing and ensuring smooth movement between different parts of your presentation.
Best Presentation Transitions in PowerPoint
It is essential to avoid overcrowding your slides with excessive information, preventing them from appearing cluttered and overwhelming. In presenting, the key focus should be on you, the speaker. Your audience’s attention should be wholly directed towards your words and delivery, not fixated on the visuals.
Keep it simple and clear on your slides, letting your expertise shine. When your presence captivates and slides complement your narrative, your presentation will have a lasting impact on your audience. It’s about you, not excessive content on the slides.
Here are the primary presentation transitions that are frequently used in PowerPoint business presentations.
Fade – The current slide gradually fades out, revealing the next slide. It’s a subtle and classic transition that works well for most presentations.
Push – The previous slide pushes the new slide into view, creating a dynamic effect. You can choose from four directions: bottom, left, right, and top.
Wipe – The new slide replaces the previous slide with a sweeping motion from a specified direction, wiping the old slide away.
Cover – The new slide covers the previous slide, sliding in from one of eight directions.
Uncover – The previous slide moves aside, uncovering the new slide underneath, which can be a great way to reveal content.
To use these, simply select the Transitions tab and choose your desired transition. Remember to use transitions sparingly and purposefully to enhance your presentation without distracting from the content or message.
Best Presentation Animations in PowerPoint
Incorporating the best presentation animations in PowerPoint can take your presentations from ordinary to extraordinary. Remember, animations are a powerful tool to enhance your message, not overpower it. Choose animations that align with your content and storytelling style, and use them strategically to emphasise key points and maintain your audience’s attention.
Entrance Animation Effects
To avoid displaying all slide elements simultaneously, consider incorporating entrance animation for certain objects. You have the option to trigger the animation to start on click, with the previous animation, or after the previous animation. Additionally, you can adjust the animation’s duration to control how long it lasts, and even apply a delay to the animation if desired.
In PowerPoint, click on the Animations tab and select More Entrance Effects to see all list of entrance animations.
Emphasis Animation Effects
To bring focus to a particular object on your slide, employing an emphasis animation effect is highly effective. It is essential to note that emphasis effects can only be added to objects that already exist on the slide. If you have applied an entrance animation to the same object, the emphasis effect will occur after the object has entered and is visible on the slide. Furthermore, remember that objects with emphasis animation will not disappear from the slide, as that functionality is reserved for the exit animation effect.
Like the Entrance Animation, select the Animations tab and select More Emphasis Effects to see all list of entrance animations.
Do note that not all emphasis effects will be applicable to all types of elements within your presentation. For instance, when animating an image, options such as Font Color and Bold Flash will be inactive and cannot be selected. Similarly, if you intend to animate a specific shape, choices like Shimmer and Grow with Color will not be accessible.
For most business presentations, it is advisable to focus on the available Basic and Subtle emphasis effects, while excluding the Grow/Shrink and Spin options. By doing so, you ensure that your animations add value to your presentation rather than overwhelming your audience. Remember, a successful presentation should captivate and inform, not create confusion or distraction.
Exit Animation Effects
Exit animations in PowerPoint refer to the effects applied to objects or elements on a slide when they are leaving or disappearing from the screen. These animations can be used to make the elements exit in a smooth and visually appealing manner, providing a seamless transition to the next slide or concealing content when it’s no longer relevant.
Click the Animations tab and select More Exit Effects to see all list of entrance animations.
Common exit animation effects in PowerPoint include Fade-out, Fly-out, Disappear, Wipe, and Zoom-out. These effects allow elements to leave the slide smoothly, creating a cohesive and visually engaging presentation.
Remember to use exit animations purposefully and sparingly. Overusing animations can be distracting and take away from the effectiveness of your presentation.
Motion Path Animation Effects
Motion path animation in PowerPoint is a powerful feature that allows you to control the movement of objects on a slide along a specified path. With motion path animations, you can add dynamic and engaging movement to your presentation, making it more visually appealing and interactive.
To apply a motion path animation in PowerPoint, go to the Animations tab and select More Motion Paths to see all list of entrance animations.
Motion path animations are particularly useful for showcasing processes, demonstrating data flows, or adding a dynamic touch to your presentations. You can animate objects to follow straight lines, curves, arcs, or custom paths to match the content’s context and visual storytelling.
Adding Sound Effects in your Animations
Adding sound effects to animations in PowerPoint for business presentations can enhance engagement and emphasise key points effectively. Sound effects in business presentations are not essential and may be optional, however, if there are instances where you find it necessary to include sound effects in your slide animations, here’s a guide on how to do it:
Select the animated element you want to add sound effects to.
In the Animation Pane, click on the animation you want to add sound effects to. A small triangle will appear on the right side. Click on this triangle to access more options, and then choose Effect Options.
Under Sound, choose from the available options.
Be mindful of adding sound effects in moderation and with intention. Too many or distracting sounds can diminish the professionalism and clarity of your presentation. Go for sound effects that harmonise with the animation and content, elevating the overall audience experience.
Conclusion
While some presentations may call for extravagant effects, the majority of business presentations benefit from a more restrained approach. By adopting basic animations, you can enhance clarity, professionalism, and consistency in your presentations while making efficient use of your valuable time. Remember, the heart of your presentation lies in your content and delivery – animations should serve to complement, not overshadow, your message.
Presentation handouts serve as valuable resources that can enhance your delivery, reinforce key points, and provide additional information to your audience. While PowerPoint is widely used for creating dynamic presentations, it can also be a powerful tool for designing compelling handouts. In this article, we will explore essential tips and techniques to help you create impactful presentation handouts using Microsoft PowerPoint.
Benefits of using a Presentation Handout
A handout serves a specific purpose by providing additional value to your presentation. It contains information that either expands on or refers to the content covered in your presentation, allowing you to delve deeper into topics that may have only been briefly mentioned. By including this information in the handout, you can keep your slides clean and uncluttered.
Furthermore, a handout can serve as a summary of your arguments and alleviate the pressure on your slides. Detailed facts and figures can be moved to the handout, allowing your PowerPoint presentation to maintain a polished and professional appearance.
Handouts offer several advantages to your audience, depending on when they are distributed:
Following the Presentation: By distributing handouts during the presentation, the audience can easily follow along with what is being said, ensuring they have all the necessary information at their fingertips.
Personal Note-Taking: Handouts enable the audience to make their own notes, supplementing or clarifying the material presented according to their own understanding and needs.
Overview for Interested Parties: Handouts provide interested parties with an overview of the content you have presented, allowing them to review and digest the information at their own pace.
How to Make Presentation Handouts via PDF
Save a new copy of your PowerPoint presentation.
Remove any duplicated or overlapping visuals or any elements that may not print clearly.
Click on the File tab and select Export.
Select PDF as file type.
Click Options if a window pops-up.
Under the Publishwhat option, choose Notespages from the drop-down menu.
Press OK then Save.
Instead of opting for physical copies and distributing your material in print, consider an eco-friendly approach by saving it as a PDF and utilising an Email Marketing System for distribution. By doing so, you can contribute to saving trees while still reaching your audience effectively. Although you may not have access to highly detailed analytics, you will still receive valuable data on email open rates and engagement, providing useful insights for your marketing efforts.
How to Make Presentation Handouts via Video
There is often an unspoken assumption that handouts must be in the form of a document, typically with slides. However, this is not always the most effective method for delivering follow-up content. While paper or PDF handouts have their advantages in terms of simplicity and distribution, they also have limitations. They can feel impersonal and may be overlooked if they contain dense information.
Fortunately, there is a powerful alternative using PowerPoint: recording narration and outputting it as a narrated video. This approach is more engaging and effective in refreshing your audience’s memories.
Create a simplified version of your PowerPoint presentation.
Record yourself presenting the presentation. Capture your narration using PowerPoint’s recording feature.
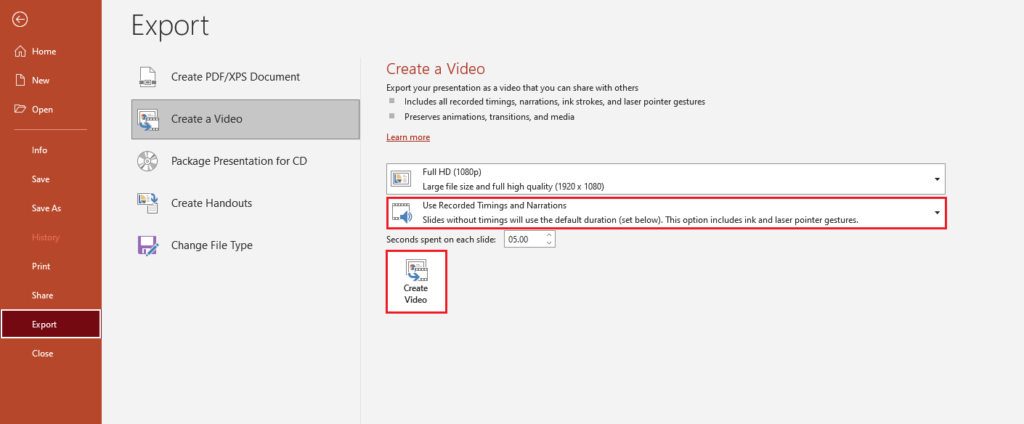
To save your video, go to File and select Export.
Choose Create a video. Make sure Use timings and narrations is selected on the drop-down menu.
Upload your video online.
How to Make Presentation Handouts via Handout Master
In your PowerPoint presentation, go to the View tab.
Select Handout Master under the Master Views submenu.
One of the advantages of this method is its user-friendly nature, allowing you to effortlessly choose slides from your presentation to serve as the basis for your handout. With just a few clicks, you can select the most relevant slides to include. Furthermore, customising headers and footers is a breeze, enabling you to insert your contact details or page numbers to enhance the professional appearance of your handout. This level of customisation ensures that your handout aligns perfectly with your specific needs and branding.
Designing your handout becomes a hassle-free task as PowerPoint offers a seamless way to choose the size, number, and layout of your pages. This convenient feature simplifies the process of printing physical copies or sharing the handout electronically with your audience. Whether you prefer a hard copy or a digital file, PowerPoint offers the versatility to meet your distribution needs effortlessly.
Tips to Further Enhance Your Presentation Handouts in Powerpoint
Use Consistent Visual Elements: Maintain consistency with your presentation by using the same colour scheme, fonts, and graphic elements in your handout. This creates a cohesive and professional look.
Incorporate Callouts and Annotations: To draw attention to important points or provide additional explanations, consider adding callouts or annotations to your handout. These visual cues can help guide your audience’s understanding and reinforce key concepts.
Utilise Infographics and Charts: Visualise data and complex information by incorporating infographics and charts into your handout. This helps to simplify complex concepts and makes the information more digestible for your audience.
Include Relevant Quotes or Testimonials: To add credibility and interest to your handout, consider including relevant quotes or testimonials from industry experts or satisfied clients. This can reinforce your key messages and provide social proof.
Consider Interactive Elements: Take advantage of PowerPoint’s interactive features, such as hyperlinks or navigation buttons, to create an interactive experience within your handout. This allows your audience to explore related resources or navigate to specific sections with ease.
Digital handouts offer a multitude of benefits. They provide a more engaging and interactive resource for your audience, enhancing their overall experience. Furthermore, the digital format allows you to track its reach, easily update the content, and measure its success. This level of flexibility and adaptability is invaluable in today’s fast-paced world.
Distributing your handout before you start speaking is a common mistake that can significantly impact audience attention. Once they have something to read, their focus may shift, making it challenging for even the most skilled presenter to command the room’s full attention.
Instead, consider withholding the handout until the end of the session. However, it’s essential to inform your audience beforehand that a handout will be available. This approach ensures they remain attentive and engaged throughout the presentation, without the distraction of trying to capture every detail in their own notes. A simple reassurance at the beginning can go a long way in fostering an environment of focused interaction.
While traditional PowerPoint presentations require manual control, self-running presentations offer a convenient solution for engaging audiences without constant intervention. In this guide, we will explore the art of creating self-running PowerPoint presentations. Whether you’re a business professional, educator, or public speaker, these tips and tricks will empower you to deliver seamless and captivating self-running presentations that leave a lasting impression.
A self-running presentation is a PowerPoint slideshow that advances automatically from slide to slide without manual control. This feature allows presenters to focus on delivering their message rather than navigating through each slide. Self-running presentations are ideal for situations where you want your content to be displayed continuously, such as trade shows, exhibition presentations, kiosks, or digital signage.
Preparing the Self-Running Presentation
On the Slide Show tab, click on Set up Slide Show.
Within this menu, you will find three different choices:
Presented by a speaker: This initial option necessitates the viewer to manually progress through each slide. This is the default setting commonly used in PowerPoint presentations and is the mode you are likely most accustomed to.
Browsed by an individual: Opting for this option generates a slideshow where the viewer lacks control over slide advancement. It functions as an autoplay feature, although the viewer must still initiate the presentation by pressing the Play button.
Browsed at a kiosk: Upon selecting this option, the slideshow will continuously loop until a viewer presses the escape button. This setting is particularly useful in kiosk or exhibition settings.
If you prefer to restrict viewer control over the slideshow’s start and stop, choose the Browsed at a kiosk option. This selection automatically activates the “Loop Continuously” feature underneath.
Creating Automatic Timings
During a live presentation, it is common to have control over the timing of animations and slide transitions, requiring manual interaction by clicking the mouse to proceed.
However, in a kiosk setting, it is preferable to have the presentation’s animations and slides advance automatically. This allows passersby to read and follow the content without the need to manually operate it.
Go to the Slide Show tab and select Rehearse Timings.
Within the recording window, users have the ability to progress to the next slide, pause the presentation, view the elapsed time of the current slide, restart the recording for a specific slide, and observe the total runtime of the entire presentation.
Once the recording of the final slide is complete, PowerPoint prompts users with a choice to keep or discard the slide timings.
Adding Recordings
Moreover, you can utilise your self-running PowerPoint slideshow in a kiosk scenario where your presence may not be constant. If you wish to incorporate a voiceover providing commentary or explanations for your slides, you have the option to record yourself, and your presentation will automatically integrate the recorded audio.
On the Slide Show tab and select Record.
If you want that all narration and slide transitions are included in your presentation, ensure that Play Narrations and Use Timings are checked.
If you wish to create a sequence of slides without any accompanying audio, make sure to uncheck the Play Narrations option.
Before recording your presentation, here are some quick tips to ensure a smooth and professional result:
Practise and Rehearse: Familiarise yourself with the content and flow of your presentation. Practice delivering it smoothly to enhance your confidence and minimise any potential mistakes during recording.
Check Audio and Equipment: Test your microphone or audio recording device to ensure clear sound quality. Make sure your equipment is functioning properly and positioned correctly for optimal audio capture.
Clear Background Noise: Choose a quiet location for recording to minimise background noise. Turn off any potential sources of disturbance such as fans, phones, or notifications that could interfere with the audio.
Visuals and Slides: Review your slides for any formatting issues, typos, or inconsistencies. Ensure that your visuals are clear, visually appealing, and properly aligned. Double-check that all content is readable and appropriately sized.
Script or Outline: Consider having a script or outline handy to guide you during the recording. This can help maintain a smooth flow and ensure you cover all key points effectively.
Why are Self-Running Presentations Advantageous
Self-Running Presentations offer several advantages that make them highly beneficial in various scenarios. Here are three reasons why self-running presentations are helpful:
Convenience and Efficiency. Self-running presentations eliminate the need for manual control, allowing presenters to focus on other aspects of their event or engage with their audience directly. By automating the presentation, you can save time, streamline your workflow, and ensure a seamless experience for your viewers.
Consistency in Delivery. With self-running presentations, you can ensure consistent delivery of your content. Each slide transitions at the pre-determined timing, eliminating the potential for human error or inconsistencies in manually clicking through slides. This guarantees that your message is conveyed in a structured and uniform manner, enhancing the professionalism and impact of your presentation.
Enhanced Audience Engagement. Self-running presentations can captivate and engage your audience more effectively. By carefully timing slide transitions, incorporating captivating visuals, and utilizing subtle animations, you can create an immersive experience that holds the attention of your viewers. Additionally, the absence of manual intervention reduces distractions, enabling your audience to focus solely on the content being presented. This heightened engagement can lead to better retention of information and a more memorable experience for your viewers.
Automated Information Display. Self-running presentations are ideal for scenarios where information needs to be continuously displayed or updated. For example, in exhibitions or trade shows, self-running presentations can serve as an interactive information hub that showcases products, services, or key messages.
In conclusion, mastering the art of creating self-running presentations empowers you to deliver captivating content without the need for constant manual control. By following the steps outlined in this guide and incorporating the provided tips and tricks, you can create engaging slideshows that leave a lasting impact on your audience. Remember, a well-executed self-running presentation not only saves time but also showcases your professionalism and expertise in delivering compelling visual narratives.
PowerPoint is a versatile presentation software that can be further enhanced by using keyboard shortcuts. These time-saving shortcuts allow you to perform tasks quickly and efficiently. In this article, we will explore the best PowerPoint shortcuts to help you become a proficient PowerPoint user.
Whether you’re a student, professional, or presenter, these shortcuts will elevate your productivity and streamline your PowerPoint workflow.
Formatting Shortcuts
Formatting shortcuts allow you to quickly apply formatting options without the need to navigate through menus and ribbons. This saves you time and enables you to focus on content creation rather than spending excessive time on formatting tasks.
Text Formatting Shortcuts
Ctrl + B: Bold Shortcut
Function: Applies bold formatting to selected text.
Ctrl + I: Italic Shortcut
Function: Applies italic formatting to selected text.
Ctrl + U: Underline Shortcut
Function: Applies or removes underlining to selected text.
Ctrl + Shift + >: Increase Font Size Shortcut
Function: Increases the font size of selected text.
Ctrl + Shift + <: Decrease Font Size
Function: Decreases the font size of selected text.
Ctrl + Shift + A: Toggle Capitalisation
Function: Toggles the capitalisation of selected text between lowercase, uppercase, and sentence case.
Ctrl + Shift + F: Change Font
Function: Opens the Font dialog box to change the font style and attributes of selected text.
Ctrl + Shift + W: Underline Words Only
Function: Applies or removes underlining to only the individual words within selected text.
Ctrl + Shift + K: Small Caps
Function: Applies small caps formatting to selected text.
Ctrl + 1: Single Line Spacing
Function: Applies single line spacing to selected text.
Slide Formatting Shortcuts
Ctrl + D: Duplicate Slide Shortcut
Function: Creates a duplicate of the selected slide.
Ctrl + M: Insert Slide
Function: Inserts a new slide at the current position.
Function: Creates a duplicate of the selected slide while preserving the original formatting.
Ctrl + Shift + P: Insert Slide from Another Presentation
Function: Inserts a slide from another PowerPoint presentation.
Navigation Shortcuts
With navigation shortcuts, you can easily select and jump to specific slides within your presentation. This is especially useful when you need to navigate to a particular slide for reference, revision, or to address specific audience questions.
Slide Navigation Shortcuts
Ctrl + Home: Go to the First Slide
Function: Navigates to the first slide in the presentation. Ctrl + End: Go to the Last Slide Function: Navigates to the last slide in the presentation.
Ctrl + G: Go to Slide
Function: Jumps to a specific slide by entering its slide number.
Ctrl + Up Key: Go to Previous Slide
Function: Navigates to the previous slide in the presentation.
Ctrl + Down Key: Go to Next Slide
Function: Moves to the next slide in the presentation.
Editing Shortcuts
Editing shortcuts allow you to perform editing tasks quickly and efficiently. Instead of manually navigating through menus and options, you can accomplish tasks with just a few keystrokes. This saves time, especially when working on large presentations with extensive content.
Copy, Cut, and Paste Shortcuts
Ctrl + C: Copy
Function: Copies the selected text or object.
Ctrl + X: Cut
Function: Cuts the selected text or object.
Ctrl + V: Paste
Function: Pastes the copied or cut content.
Ctrl + Alt + V: Paste Special
Function: Opens the Paste Special dialog box for advanced pasting options.
Undo and Redo Shortcuts
Ctrl + Z: Undo
Function: Reverses the last action performed.
Ctrl + Y: Redo
Function: Reverses the last undo action.
Slideshow Presentation Shortcuts
Slideshow presentation shortcuts allow you to navigate through your presentation smoothly and seamlessly. By quickly moving between slides, you can maintain the audience’s engagement and ensure a cohesive flow of information.
Start and Navigate Slideshow
F5: Start Slideshow from the Beginning
Function: Initiates the slideshow from the first slide.
Shift + F5: Start Slideshow from the Current Slide
Function: Begins the slideshow from the current slide.
Spacebar or Enter: Advance to Next Slide
Function: Moves to the next slide in the slideshow.
Backspace or Up Arrow: Go to Previous Slide
Function: Navigates to the previous slide in the slideshow.
Esc: End Slideshow
Function: Exits the slideshow and returns to normal editing mode.
Slide Show Tools
B or . (Period): Blank the Screen
Function: Temporarily hides the slide content during the presentation to draw attention to the presenter
W or , (Comma): White or Black Screen
Function: Displays a white or black screen during the slideshow.
Ctrl + P: Display Pointer
Function: Activates the pointer during the slideshow.
Ctrl + A: Hide/Show Mouse Cursor
Function: Toggles the visibility of the mouse cursor during the slideshow.
N: Toggle Notes Pane
Function: Toggles the display of the Notes pane during a slide show.
M: Mute/Unmute Audio
Function: Mutes or unmutes the audio during a slide show if audio is present.
T: Set Timer
Function: Sets a timer during the slide show to keep track of presentation time.
Ctrl + Plus (+): Zoom In
Function: Zooms in on the slide during a slide show.
Ctrl + 0: Fit Slide to Window
Function: Adjusts the slide size to fit the slide show window during a presentation.
Formatting and Object Manipulation Shortcuts
Formatting and object manipulation shortcuts allow you to quickly apply formatting options and make adjustments to objects without the need to navigate through menus and ribbons. This saves you time and enables you to focus on content creation and design.
Group and Ungroup Objects
Ctrl + G: Group Objects
Function: Groups selected objects into a single unit.
Ctrl + Shift + G: Ungroup Objects
Function: Disassembles a grouped object into individual components.
Function: Decreases the size of the selected object(s).
Ctrl + R: Rotate Object
Function: Rotates the selected object clockwise by 15 degrees.
Ctrl + Shift + R: Rotate Object Counterclockwise
Function: Rotates the selected object counterclockwise by 15 degrees.
Ctrl + Shift + Arrow Keys: Nudge Objects
Function: Moves the selected object(s) by small increments in the corresponding direction.
Presentation View Shortcuts
Presentation view shortcuts allow you to navigate through your slides and control your presentation with ease. They provide a seamless and uninterrupted experience, allowing you to focus on delivering your message to the audience.
Normal View
Ctrl + Shift + N: Switch to Normal View
Function: Transitions to the Normal View, which is the default editing mode.
Slide Sorter View
Ctrl + Shift + S: Switch to Slide Sorter View
Function: Changes to the Slide Sorter View, displaying thumbnail previews of all slides.
Notes Page View
Ctrl + Shift + H: Switch to Notes Page View
Function: Transitions to the Notes Page View, where you can add and edit speaker notes.
Reading View
Shift + F5: Switch to Reading View
Function: Enters the Reading View, which simulates a presentation environment.
Animation and Transition Shortcuts
By utilising shortcuts, you can streamline your workflow when working with animations and transitions. These shortcuts enable you to make adjustments, reorder animations, or modify timing without interrupting your creative process or having to manually click through various menus.
Animation Shortcuts
Ctrl + Shift + F9: Clear Animation
Function: Removes all animations from the selected slide or object.
Alt + Shift + Left Arrow: Move Animation Left
Function: Moves the selected animation left in the animation order.
Alt + Shift + Right Arrow: Move Animation Right
Function: Moves the selected animation right in the animation order.
Transition Shortcut
Ctrl + Shift + Up Arrow: Previous Slide Transition
Function: Applies the previous slide transition to the selected slide.
Ctrl + Shift +Down Arrow: Next Slide Transition
Function: Applies the next slide transition to the selected slide.
Ctrl + Spacebar: Remove Transition
Function: Removes the transition from the selected slide.
Miscellaneous Shortcuts
Miscellaneous shortcuts encompass a range of functions that can enhance your productivity in PowerPoint. Whether it’s navigating through different views, accessing specific tools or features, or performing quick actions, these shortcuts save time and make your workflow more efficient.
Save and Open Shortcuts
Ctrl + S: Save Presentation
Function: Saves the current presentation.
Ctrl + O: Open Presentation
Function: Opens an existing PowerPoint presentation.
Conclusion
Mastering PowerPoint shortcuts can significantly enhance your productivity and efficiency when creating and delivering presentations. By familiarizing yourself with these 70 essential shortcuts, you can streamline your workflow, save time, and accomplish more with PowerPoint. Whether you’re formatting text, navigating through slides, editing content, or delivering a presentation, these shortcuts will empower you to work smarter and achieve professional results. Incorporate these time-saving techniques into your PowerPoint repertoire and unlock your full potential as a presenter and content creator.
This website uses cookies to improve your experience while you navigate through the website. Out of these, the cookies that are categorized as necessary are stored on your browser as they are essential for the working of basic functionalities of the website. We also use third-party cookies that help us analyze and understand how you use this website. These cookies will be stored in your browser only with your consent. You also have the option to opt-out of these cookies. But opting out of some of these cookies may affect your browsing experience.
Necessary cookies are absolutely essential for the website to function properly. These cookies ensure basic functionalities and security features of the website, anonymously.
Cookie
Duration
Description
cookielawinfo-checkbox-analytics
11 months
This cookie is set by GDPR Cookie Consent plugin. The cookie is used to store the user consent for the cookies in the category "Analytics".
cookielawinfo-checkbox-functional
11 months
The cookie is set by GDPR cookie consent to record the user consent for the cookies in the category "Functional".
cookielawinfo-checkbox-necessary
11 months
This cookie is set by GDPR Cookie Consent plugin. The cookies is used to store the user consent for the cookies in the category "Necessary".
cookielawinfo-checkbox-others
11 months
This cookie is set by GDPR Cookie Consent plugin. The cookie is used to store the user consent for the cookies in the category "Other.
cookielawinfo-checkbox-performance
11 months
This cookie is set by GDPR Cookie Consent plugin. The cookie is used to store the user consent for the cookies in the category "Performance".
viewed_cookie_policy
11 months
The cookie is set by the GDPR Cookie Consent plugin and is used to store whether or not user has consented to the use of cookies. It does not store any personal data.
Functional cookies help to perform certain functionalities like sharing the content of the website on social media platforms, collect feedbacks, and other third-party features.
Performance cookies are used to understand and analyze the key performance indexes of the website which helps in delivering a better user experience for the visitors.
Analytical cookies are used to understand how visitors interact with the website. These cookies help provide information on metrics the number of visitors, bounce rate, traffic source, etc.
Advertisement cookies are used to provide visitors with relevant ads and marketing campaigns. These cookies track visitors across websites and collect information to provide customized ads.


Recent Comments